

The jaw frontal angle is a two-dimensional angle between two lines that follow the lower jaw borders in a front photo. Each line starts at a visible gonion, or jaw corner, and runs toward the chin. Extend both lines until they meet below the chin. That meeting point is the vertex. The result describes visible lower-face taper in that photo. It isn't the side-view gonial angle, and it doesn't measure bone.
Formula: jaw frontal angle = arccos((VA · VB) / (|VA| × |VB|)). V is the intersection below the chin. A and B are points on the left and right border lines, such as the two gonia. VA and VB are vectors from V to those points. The centered dot is the dot product, while the vertical bars mean vector length. Arccos returns the angle, which is reported in degrees.
How the jaw frontal angle is constructed
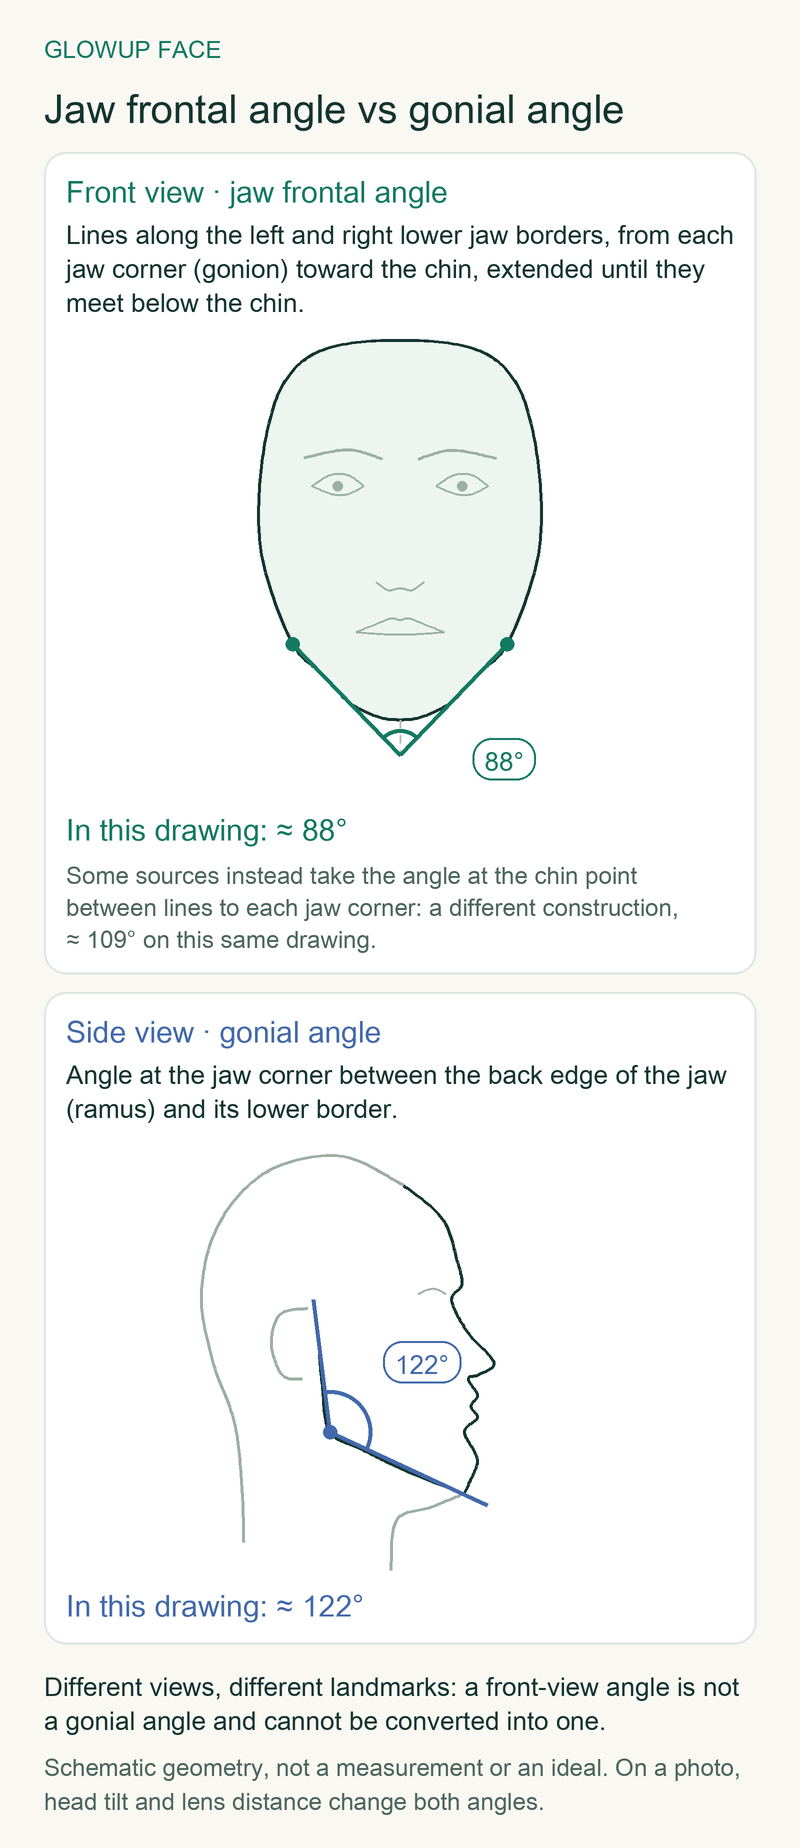
Mark the left and right gonion, written goL and goR. On a photo, each is the visible corner where the side of the lower face turns toward the chin. Then mark one more point on each lower jaw border. Those two point pairs define the left and right lines. Their extension meets at V below the chin. The extra border point is a contour sample, not a universally standardized anthropometric landmark.
The gonion is harder to mark than the name implies. Caple and Stephan's 2016 nomenclature paper explains that a three-dimensional skull landmark can't always transfer cleanly to a two-dimensional face. Cummaudo and colleagues tested 24 operators in 2013. Gonion had among the highest placement dispersion on frontal photographs.
The accompanying schematic keeps three numbers separate. Its front-view jaw-border construction reads 88°. A chin-vertex construction on the same drawing reads 109°. The side-view gonial angle reads 122°. Every value is illustrative, not a measurement or an ideal.
Three measurements that are easy to mix up
The jaw-border construction uses four visible border points and a calculated vertex below the chin. Some sources use a chin-vertex construction instead. They place the vertex at soft-tissue menton, then draw lines to both gonia. Negi and Chitra's 2019 photographic protocol defines menton as the lowest midline point of the soft-tissue chin.
Other sources may use pogonion, the most forward chin point. Menton and pogonion aren't interchangeable, and the resulting angles are different numbers. Always check the named vertex and endpoints before comparing results.
The side-view gonial angle guide covers another construction. In anatomy, it is the angle between the back edge of the mandibular ramus and the lower border of the mandibular body. Prevost and colleagues used that definition in a 2020 study of 60 reconstructed mandibles. A profile photograph or radiograph shows that relationship; a frontal jaw-border angle does not.
Keep width separate too. Bigonial width is the distance between the two gonia. A width ratio divides that distance by another width. An angle compares directions. You can't convert any one of these into the others without more geometry.
A worked example with synthetic coordinates
Use a pixel grid with its origin at the image's top-left corner. The x-coordinate increases to the right, and y increases downward. Here, left and right mean image-left and image-right. These coordinates are synthetic. They don't describe a person, customer, product result or tested face.
| Construction | Left gonion and border point | Right gonion and border point | Vertex | Angle |
|---|---|---|---|---|
| Jaw-border baseline | goL (160, 260) px; L (210, 311.79) px | goR (440, 260) px; R (390, 311.79) px | V (300, 405) px | 88.0° |
| Chin-vertex alternative, same synthetic face | goL (160, 260) px; L unchanged but not used | goR (440, 260) px; R unchanged but not used | soft-tissue menton C (300, 360) px | 108.9° (109° rounded) |
| Sensitivity: L moved 3 px down | goL (160, 260) px; L (210, 314.79) px | goR (440, 260) px; R (390, 311.79) px | V (296.06, 409.08) px | 86.4° (change: -1.6°) |
In the baseline, the border lines meet at V (300, 405). The vectors to the gonia are VA = (-140, -145) and VB = (140, -145). Substituting them into the formula gives 87.99°, rounded to 88.0°.
For the alternative, the vertex moves to the synthetic menton C (300, 360). Lines from C to the same two gonia produce 108.92°, rounded to 109°. The face didn't change. The construction did.
The last row moves only the left border point three pixels downward. The intersection shifts, and the angle falls from 88.0° to 86.4°. A tiny placement change moves the result by 1.6°. This is a sensitivity example, not a precision claim.
Why another photo can give another result
Head pitch changes the visible drop from jaw corner to chin. Yaw foreshortens one side more than the other. Moreton and Morley photographed 25 people at different horizontal and vertical camera angles in 2011. For some facial measurements, variation between photos of the same person was as large as variation between different people.
Distance matters as well. Derakhshan and colleagues photographed 12 faces at six distances for a 2024 Laryngoscope study. Smartphone images taken at 8 and 12 inches showed measurable distortion in facial proportions. That study measured other regions, not this angle, so it supports careful capture rather than a correction formula.
A two-dimensional photo estimate reflects soft tissue, lens distance, head pose and expression. It cannot measure bone or supply clinical values. Facial hair, shadows and jaw tension can also move the visible edge you choose.

Make comparison photos more consistent
- Put the camera near face height and move it beyond arm's length. Crop afterward instead of using a close selfie.
- Face the camera squarely. Keep both ears similarly visible and avoid looking up or tucking your chin.
- Relax your jaw and keep the same neutral expression. Don't compare a clenched frame with a relaxed one.
- Use even front light. Keep hair and facial hair from hiding the lower border.
These steps reduce obvious variation; they don't validate the angle as anatomy. For a broader setup, use the camera-distance and lighting guide.
There is no universal ideal
This number describes one construction in one image. It isn't a beauty grade or a target. Published ranges may use different landmarks, angle directions, populations or model settings. A range is meaningless unless its construction matches yours.
You can still use the visible outline for styling. A haircut may add width or height around the upper face. A beard edge can make the lower outline look straighter or more tapered. Glasses or brow styling can shift visual emphasis upward. These are optional framing choices, not corrections.
Use the outline for one practical next step
If your goal is choosing hair or glasses, try the face-shape finder for the visible outline. It estimates a broad styling category from a front photo. It does not output this angle, measure bone or grade your face.

Oscar Nascimento
Editorial writer, GlowUp Face
Oscar writes about evidence-based skin care, healthcare, looksmaxxing, and the social and economic research surrounding appearance.
Full profile and all articles →


